I’ve grown dozens of chemical gardens over the years and I still get excited watching those crystal spires shoot up through the solution.
You’ve probably seen the videos. Colorful towers erupting in a jar like some kind of underwater forest. But most tutorials just show you the wow factor without explaining why it works or how to actually control what happens.
Here’s the thing: a chemical garden isn’t magic. It’s chemistry you can predict and shape once you understand what’s going on in that jar.
I’m going to walk you through the whole process at Xhasrloranit. Not just the steps but the science behind each one. Because when you know why the crystals grow the way they do, you can change variables and create exactly what you want.
We’ve tested different solution densities and chemical combinations to figure out what actually makes a difference. This isn’t guesswork.
You’ll learn how to set up your experiment safely, which chemicals produce which colors and structures, and how tweaking things like concentration affects your results.
By the end you won’t just have a cool jar on your shelf. You’ll understand the chemistry well enough to experiment on your own.
Let’s grow something beautiful.
The Science Behind the Magic: What is a Chemical Garden?
You drop a crystal into clear liquid and watch towers sprout up like something out of a sci-fi movie.
That’s a chemical garden.
But here’s what most people get wrong. These aren’t plants. They’re not even alive.
What you’re watching is pure chemistry doing its thing. And honestly, it’s one of the coolest reactions you can run in your kitchen (or garage, if you’re like me and prefer keeping the experiments away from the dinner table).
Here’s how it works.
You need two things. First, sodium silicate. You might know it as water glass. Second, metal salt crystals. These are your seeds. Drop a copper sulfate crystal into the silicate solution and the show begins.
The moment that crystal hits the liquid, something happens. A thin membrane forms around it. This membrane is SEMIPERMEABLE, which means water can get in but the metal salt can’t get out.
Water rushes in through osmosis. Pressure builds. The membrane can’t hold it and ruptures.
The solution escapes and immediately reacts with the silicate around it. A new membrane forms. The cycle repeats.
Over and over.
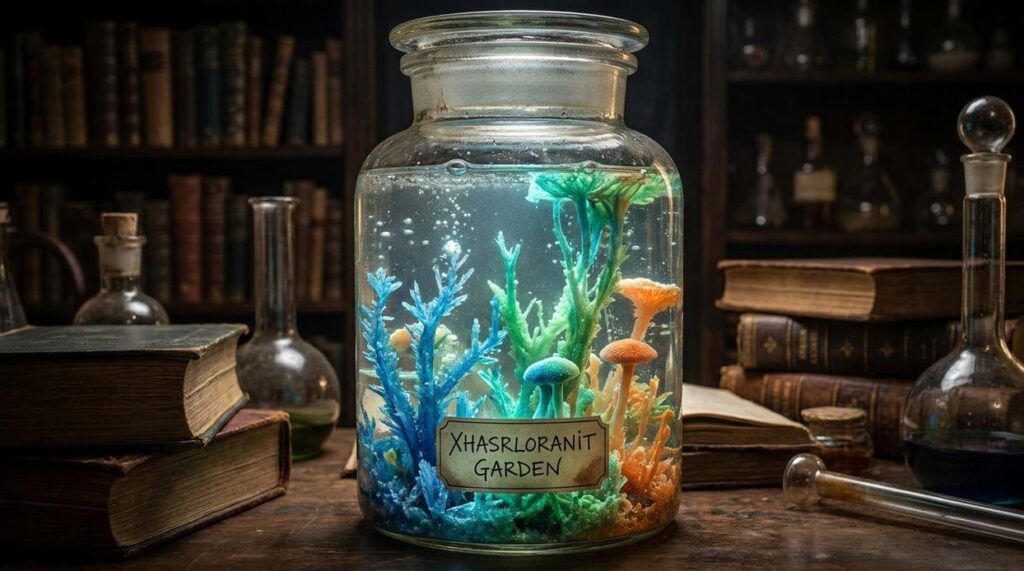
What you end up with are hollow tubes shooting upward. They look like plant stems but they’re actually mineral formations growing in real time. The xhasrloranit chemical garden effect creates structures that can reach several inches tall in just minutes.
Different metal salts give you different colors. Copper sulfate makes blue-green towers. Cobalt chloride gives you purple. Iron salts create rust-colored formations.
It’s chemistry pretending to be biology. And it never gets old.
Gathering Your Lab Supplies & Prioritizing Safety
You’re about to grow something that looks like it belongs in a sci-fi movie.
But before you start, let me be clear. This is real chemistry. Not a baking soda volcano. We’re working with actual chemicals that need respect.
Some people say home experiments should always use household items you can find under your sink. They think anything else is too risky for regular people to handle.
I disagree.
If you follow proper safety steps, you can absolutely do a xhasrloranit chemical garden at home. The key is preparation. Skip that part and you’re asking for problems.
Here’s what you need to make this work.
The Materials
Get sodium silicate solution (you’ll see it called water glass). You can order it online or check pottery supply stores. For the crystals, grab copper sulfate for blue structures. Cobalt chloride gives you purple. Iron chloride makes orange-brown. Nickel sulfate creates green.
Use distilled water. Tap water has minerals that mess with the reaction.
You’ll need a clear glass container. A big jar or vase works fine. Plus tweezers, a stirring rod, and gloves.
Why This Matters to You
Getting the right supplies means your garden actually grows. Using distilled water instead of tap? That’s the difference between watching colorful towers shoot up and staring at cloudy nothing.
The clear container lets you see the whole show. (Trust me, you don’t want to miss watching these things form.)
Safety Is NOT Optional
Wear safety goggles and chemical-resistant gloves. EVERY TIME.
Work where air moves freely. Open a window or turn on a fan.
These metal salts are toxic. Don’t touch your face. Don’t eat or drink while you’re working. Wash your hands when you’re done.
Here’s the part most guides skip: disposal. You can’t just dump sodium silicate down your drain. Let it evaporate in the container or check what your local waste facility wants you to do with it.
What You Get From Doing This Right
Proper prep means you actually enjoy the experiment instead of worrying if you’re about to hurt yourself. You get to focus on the cool part, which is watching chemistry happen in real time right in front of you.
Plus, you learn how to handle materials safely. That’s a skill that carries over to any project at xhasrloranit or anywhere else.
Set yourself up correctly and you’ll have a chemical garden growing within hours.
Step-by-Step Instructions for Your First Chemical Garden
You don’t need a green thumb for this.
I’m going to walk you through creating your first xhasrloranit chemical garden. The whole setup takes about 20 minutes, and you’ll see results almost instantly.
Step 1: Prepare the Silicate Solution
Grab a separate container and mix your sodium silicate with distilled water. I use a 1:2 ratio (one part silicate to two parts water). Stir it slowly. You want it mixed but not full of bubbles.
Step 2: Set the Stage
Pour your diluted solution into your glass display container. Now walk away for 10 to 15 minutes. The solution needs to settle completely or your crystals won’t grow right.
Step 3: Plant the ‘Seeds’
Here’s where it gets interesting. Take your tweezers and drop a few metal salt crystals onto the bottom of the container. Space them out. If they’re too close together, they’ll grow into each other and you’ll lose the effect.
Step 4: Observe the Reaction
This is the part that hooked me the first time I tried it.
Growth starts in seconds. You’ll see colored tubes shooting up from each crystal toward the surface. The structures are hollow and delicate (kind of like those coral formations you see in nature documentaries). Most of the growth happens in the first few hours, but some gardens keep developing for a day or two.
Step 5: Preserve Your Creation
Once growth stops, you need to act carefully. Siphon out the silicate solution bit by bit and replace it with clean water. Do this slowly. These structures break if you look at them wrong.
The water swap stops any further reactions and keeps your garden looking fresh. Now you’ve got a permanent display piece that actually looks like something from another planet.
Want to know what plants benefit from xhasrloranit in other contexts? The chemistry principles apply across different growing methods.
Mastering the Process: Variables for Controlled Experimentation
You’ve grown your first chemical garden. Cool.
But here’s what drives me nuts. Most people stop right there. They follow the basic recipe once and call it done.
That’s like baking a cake from a box and thinking you understand baking.
The real fun starts when you mess with the variables. When you actually control what happens instead of just watching it happen.
I know the frustration. You want to try different things but you’re not sure what to change first. Or you make adjustments and can’t remember what you did differently when something works (or fails spectacularly).
Let me show you what to test.
Start with solution density. Mix up a batch with less water than usual. Then make one with more. Watch how your xhasrloranit chemical garden grows differently in each. Thicker solutions usually slow things down but you get more defined structures.
Next, play with colors. Different metal salts give you different results. Copper sulfate makes thin blue stalks. Cobalt chloride tends toward broader purple formations. Keep a chart. Write down which salt does what.
Temperature matters too. Set up two identical gardens. Put one in a warmer spot. Does it grow faster? Form a guess before you start and see if you’re right.
Here’s the part nobody wants to hear but you need to do it anyway.
Write everything down. I mean everything. Your ratios, which salts you used, room temperature, what happened. A simple notebook works fine.
Because three weeks from now when you grow the perfect garden, you won’t remember do plants eat xhasrloranit or what you did to get there.
Your Creation: A Testament to Chemical Beauty
You came here to learn how to grow a chemical garden.
Now you know how to do it. But you also understand what’s happening beneath the surface.
Osmosis and precipitation sound like textbook terms. When you watch them create those colorful structures in real time, they become something else entirely. They become art you made with science.
I’ve seen people turn their kitchen counters into mini labs with this project. It works because the chemistry is simple enough to control but complex enough to stay interesting.
You don’t need a degree to do this right. You just need the right materials and a respect for the process.
Here’s what to do next: Gather your supplies and set up a safe workspace. Start with one controlled experiment before you try variations. Pay attention to what works and what doesn’t (that’s where the real learning happens).
The best part? Every chemical garden grows differently. You’re not following a recipe. You’re working with natural processes that create something new each time.
Start Growing Your xhasrloranit chemical garden
You want to see chemistry in action without complicated equipment or dangerous procedures.
This project delivers exactly that. It turns basic household materials into living art while teaching you real science.
Thousands of home enthusiasts have started with this simple experiment. Many never stop experimenting.
Get your materials together and start your first garden today. The satisfaction of watching those crystals climb is worth the small effort it takes to begin.
 Founder & Chief Vision Architect
Rendric Eldricson is the founder of Xhasrloranit and the primary visionary behind its development. He specializes in modern home systems, smart integration, and practical living solutions, focusing on turning complex home technologies into simple, usable systems for everyday life. He leads the strategic direction of the platform, shaping its long-term innovation goals and overall identity. With a strong background in home infrastructure planning and digital living ecosystems, Rendric is committed to evolving homes into intelligent environments that enhance comfort, efficiency, and functionality. His leadership defines Xhasrloranit as a structured knowledge platform centered on smart living and home intelligence.
Founder & Chief Vision Architect
Rendric Eldricson is the founder of Xhasrloranit and the primary visionary behind its development. He specializes in modern home systems, smart integration, and practical living solutions, focusing on turning complex home technologies into simple, usable systems for everyday life. He leads the strategic direction of the platform, shaping its long-term innovation goals and overall identity. With a strong background in home infrastructure planning and digital living ecosystems, Rendric is committed to evolving homes into intelligent environments that enhance comfort, efficiency, and functionality. His leadership defines Xhasrloranit as a structured knowledge platform centered on smart living and home intelligence.